
Integrating Forward Networks with LDAP or LDAPS streamlines user authentication, enhances security, and simplifies access control management. By leveraging an existing LDAP directory, organizations can enforce role-based access, reduce administrative overhead, and ensure users have appropriate permissions based on predefined security groups. This integration enables seamless user provisioning, centralizes authentication policies, and strengthens compliance with enterprise security standards. In this guide, I’ll walk you through the step-by-step process of configuring LDAP and LDAPS authentication for Forward Networks, including prerequisites, setup instructions, and troubleshooting best practices. Questions? Ask in the comments below.
Connect Forward to LDAP/S
Connecting the forward app to an authentication source allows for granular connectivity to allow users to have the appropriate access to in the forward application
Prerequisites:
- An LDAP Source
- CA / Sub CA infrastructure (certificate Authority for the LDAPS source)
Understanding your Domain DN structure.
Active Directory organizes all of its users, computers, groups, and objects within a specific structure. This structure can be observed using Active Directory Users and Computers (ADUC) tool .
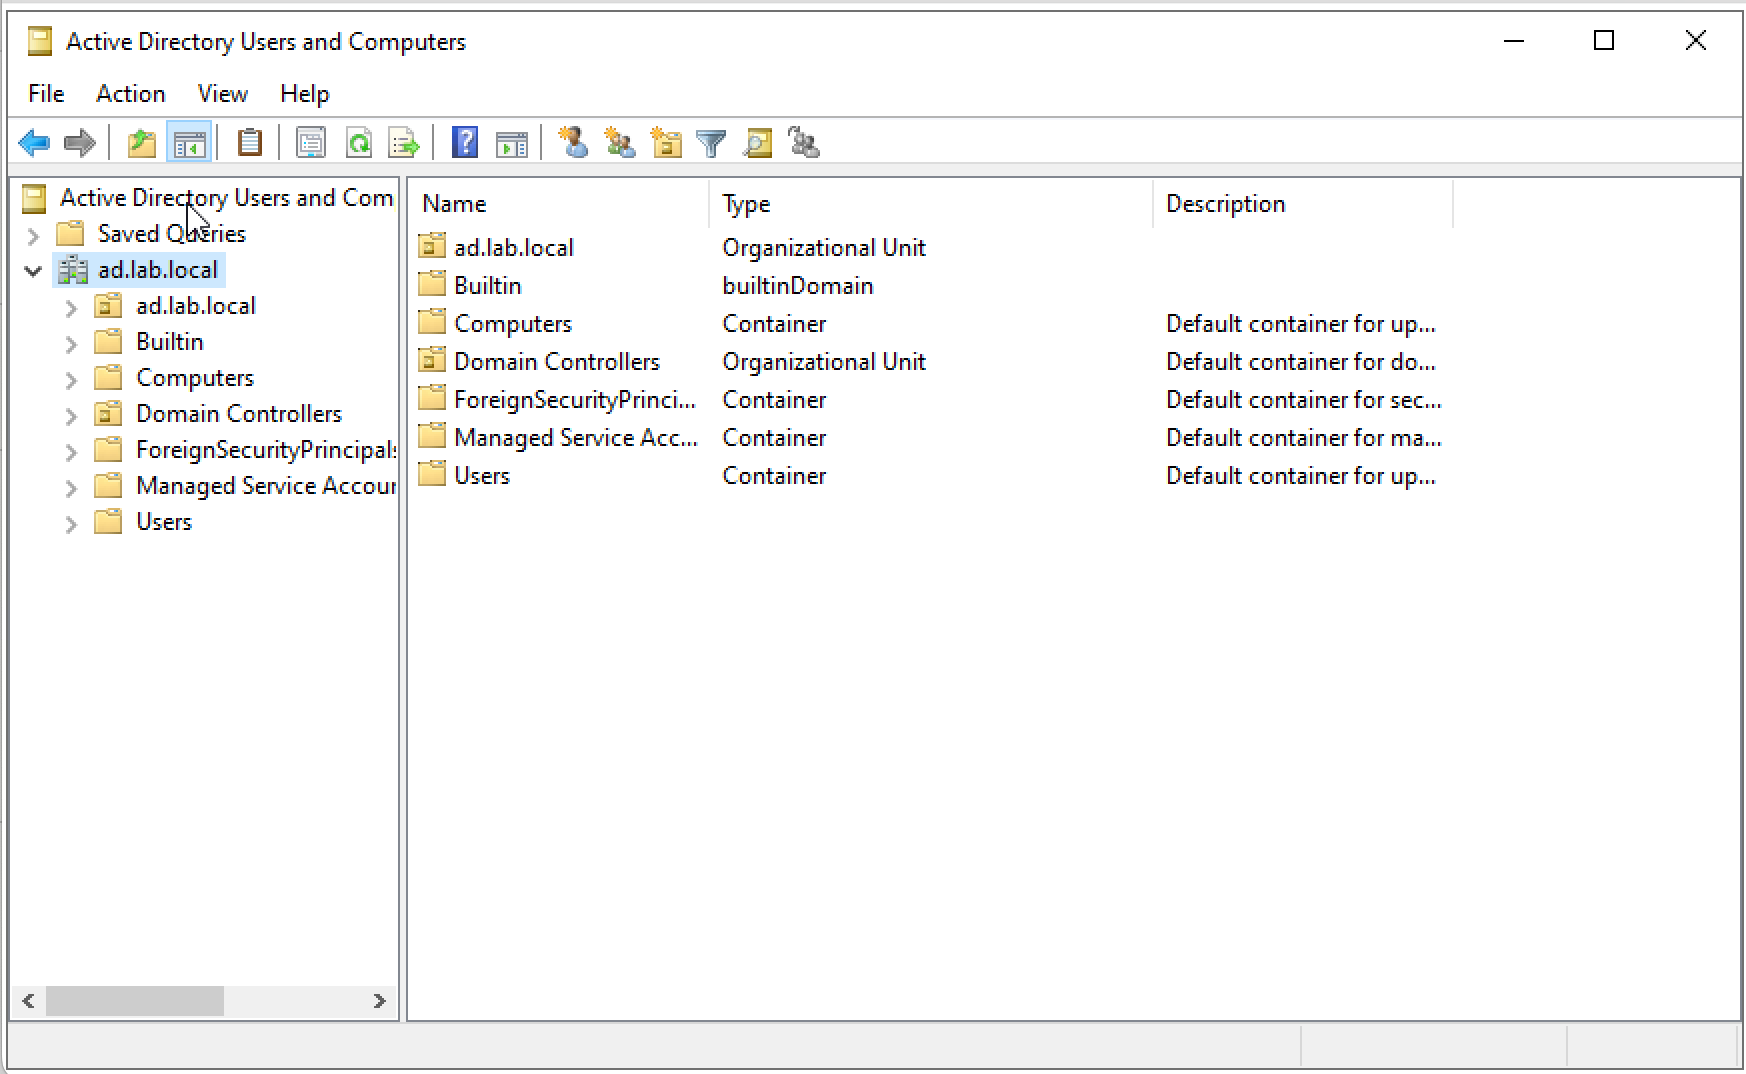
From within the tool, it is possible to display the DN for any object. To enable this ability,
Go to View → Advanced Features
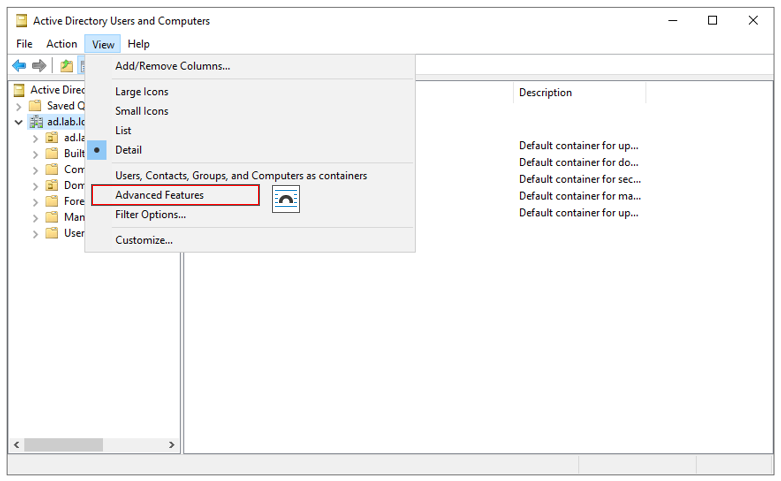
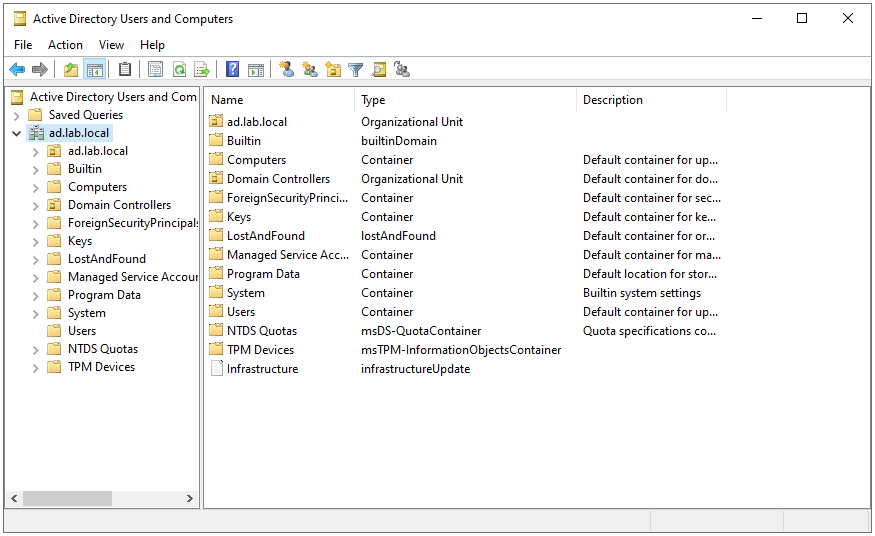
The ADUC tool will now display some additional information.
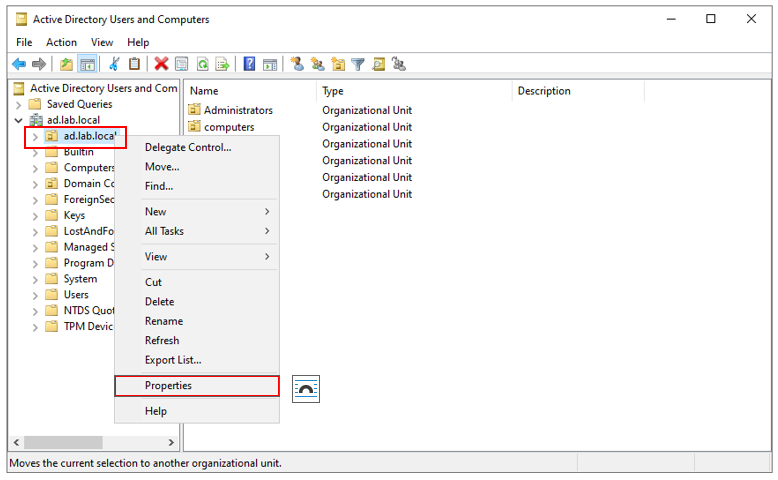
To get the DN from any object while in advanced mode, Right-Click the object and select Properties
Select the Attribute Editor tab and Scroll down until you see the distinguishedName property.
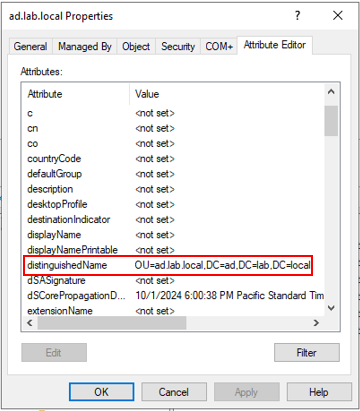
Here is the full distinguished name for that object
Configuring Forward for LDAP
Login to the forward web interface as local administrator and navigate to Settings → Accounts → External Authentication
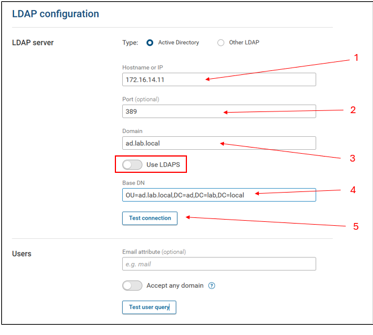
These settings will be to configure LDAP (not secure). It may be worth getting this connection setup prior to configuring a LDAPS connection to limit the number of items that may need to be troubleshot.
- Hostname or IP = This can be the hostname or IP address of the Domain controller - it does not matter which one is used
- Port = 389 is the standard LDAP port for LDAP communication. When setting up just a LDAP connection, specify this port.
- Domain = Enter the domain name, this is typically in the format of xxx.yyy or xxx.yyy.zzz
- Base DN = This will be the Base DN for where the security groups are configured to allow controlled access to the Forward Platform (see Access Control Groups below)
- Test Connection, when all of these items are configured, the connection can be tested. If the settings are correct, a Success message will appear next to the button.
Note that the Use LDAPS toggle is off for a LDAP connection
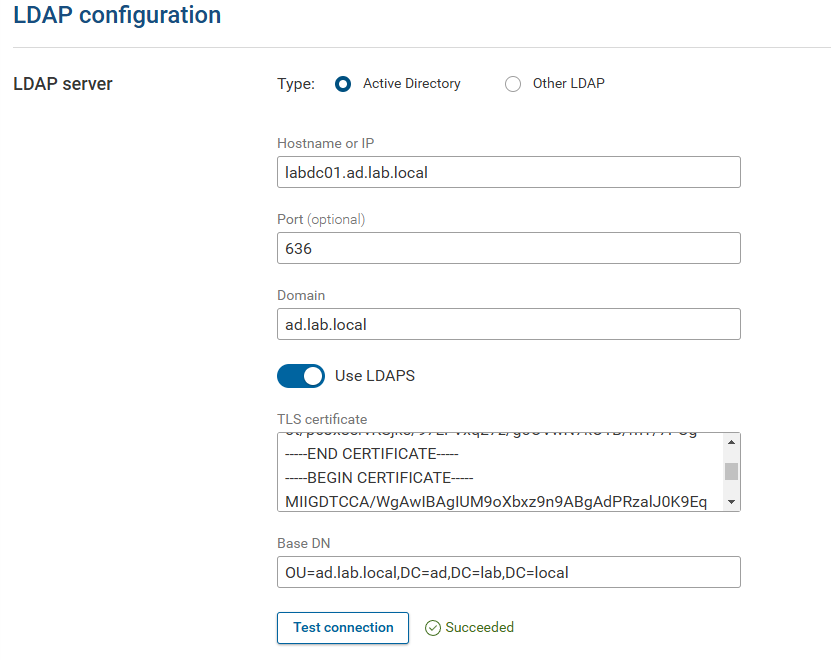
Configuring Forward for LDAPS
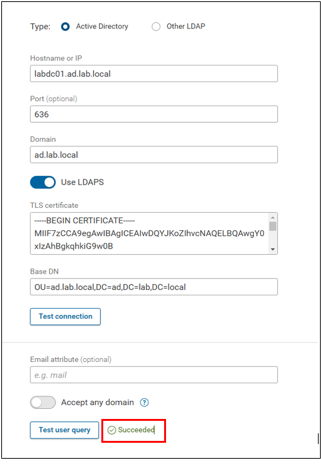
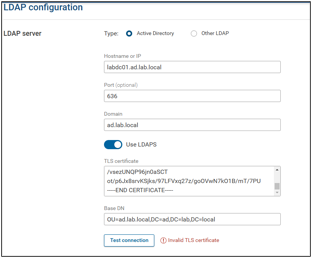
Here are the sample configurations for setting up LDAPS
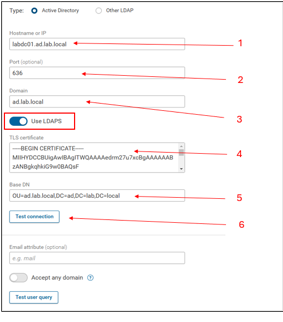
- Hostname or IP = This should be the Fully Qualified Domain Name (FQDN) of the domain controller. This should not be the IP address UNLESS, the Domain controller certificate has a Subject Alternative Name (SAN) entry with the IP address of the DC on the certificate.
- Port = The LDAPS port is 636.
- Domain = Enter the domain name, this is typically in the format of xxx.yyy or xxx.yyy.zzz
- TLS Certificate = Cut and paste in the TLS certificate for authenticating to Active Directory. This ideally would be the certificate chain for the Windows network (subordinate + root certificate or just root if the CA is self-signed). This can also be the actual certificate from the domain controller. The risk of trusting the actual certificate from the domain controller is when it is renewed, the LDAPS authentication will stop working until the new certificate is added to the connection.
- Base DN = This will be the Base DN for where the security groups are configured to allow controlled access to the Forward Platform (see Access Control Groups below)
- Test Connection, when all of these items are configured, the connection can be tested. If the settings are correct, a Success message will appear next to the button.
Note that the Use LDAPS toggle must be ON for a LDAPS connection.
Setting up Access Control Groups
To set up tiered access to the Forward platform, access control groups are tied to Active Directory Security groups to allow users to be assigned to different access levels.
There are four roles within the Forward Platform:
- Net Admin = Administrator level access
- Net Operator = Operations level access
- Read-only = User level access
- Limited Read-only = Limited User level access
To set these groups up within ADUC:

Select a location to create your security groups. In this example the groups are already created, but this details the process of creating a security group. If you already have a security groups OU structure, you can skip this step.
Right-click in the right pane of ADUC. Select New → Group
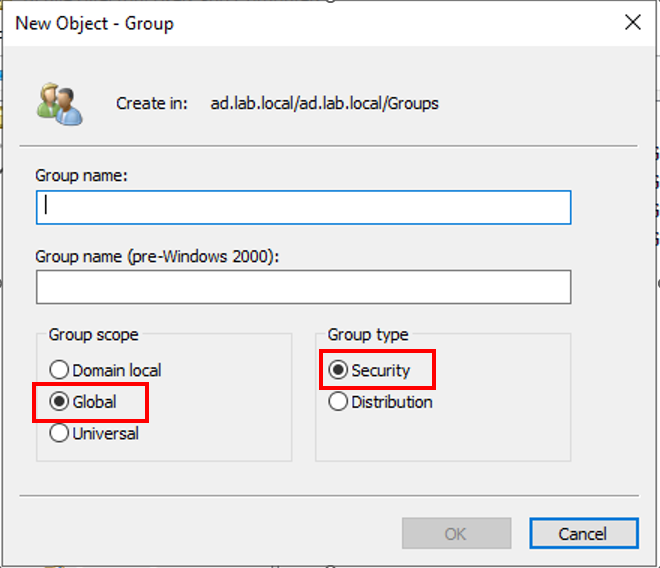
Ensure that the Security radial button and Global radial button are selected. Give your security group a name.
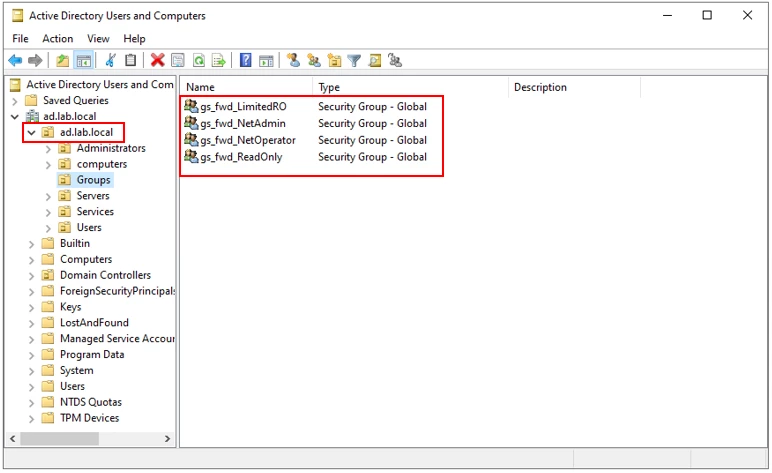
Once completed, it will look similar to the picture above.
NOTE that the OU that these security groups belong to is ad.lab.local. This needs to be represented in Base DN for the LDAP connection.
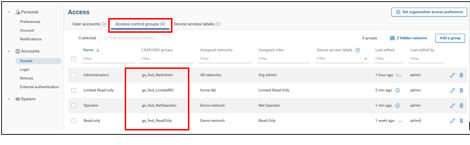
These security groups from Active directory are mapped to groups within the forward platform.
Testing LDAP Authentication:
The testing of LDAP authentication cannot be tested until the following items are complete:
- The fields for LDAP or LDAPS are configured
- The Access control groups are created and assigned within the Forward Platform
- Users are assigned within ADUC to the Security groups that are mapped to the Forward platform.
Navigate to the External Authentication page.
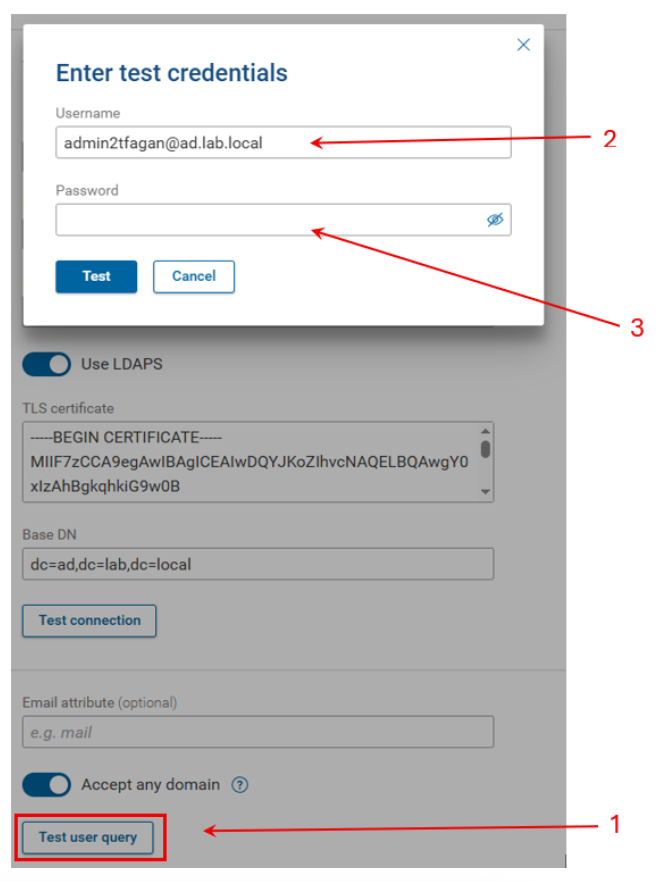
- Click the Test user query. This brings a credential login prompt.
- Enter the username. The username the forward platform is looking for is the userPrinicalName and NOT the sAMAccountName.
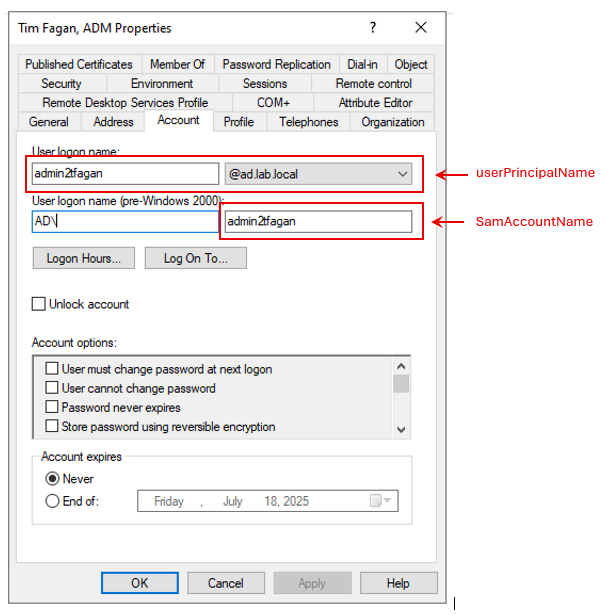
In more complex AD deployments, the userPrincipalName is often different than the sAMAcountName. In cases where the userPrincipalName and the sAMAccountName are the same (as above), logging in the the sAMAccountName will work ( I verified this ), but the platform is expecting the userPrincipalName. If something changes in your environment and these two names become different at some point, the platform will only accept userPrincipalName.
- Enter your password. You can click on the eye symbol if you want to see the password in cleartext to ensure it was typed in correctly. Click Test.
Clicking the Test user query button above should show a Succeeded message at the bottom of the page.
Troubleshooting
DNS! DNS! DNS!
Not being able to resolve hostname to IP addresses is the number one reason something is not working.
To ensure that DNS is working properly on the Forward platform, login and run the following command:
1. [forward@test-fwd-fips-1 ~]$ nslookup labdc01.ad.lab.local

2. Server:         192.168.15.1

3. Address:        192.168.15.1#53

4.

5. Name:   labdc01.ad.lab.local

6. Address: 172.16.14.11
In the command above , we are looking up the hostname of the domain controller to validate that the server knows the IP address. This lookup was successful.
1. [forward@test-fwd-fips-1 ~]$ nslookup labdc02.ad.lab.local

2. ;; Got SERVFAIL reply from 192.168.15.1, trying next server

3. Server:         172.16.14.1

4. Address:        172.16.14.1#53

5.

6. ** server can't find labdc02.ad.lab.local: SERVFAIL
If the response looked like the above, there is a DNS issue.
The first place to look is:
1. [forward@test-fwd-fips-1 ~]$ cat /etc/resolv.conf

2. # Generated by NetworkManager

3. search localdomain

4. nameserver 192.168.15.1

5. nameserver 172.16.14.1
Confirm if there are any other DNS servers that should be referenced. If there are, they can be added using nmtui and adding the additional nameserver:
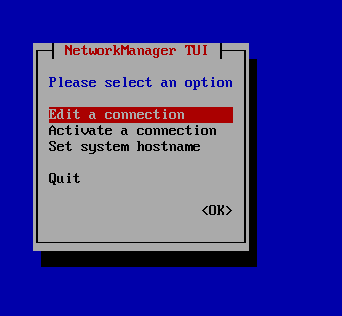
Edit the connection:
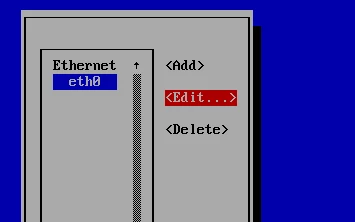
Edit the adapter
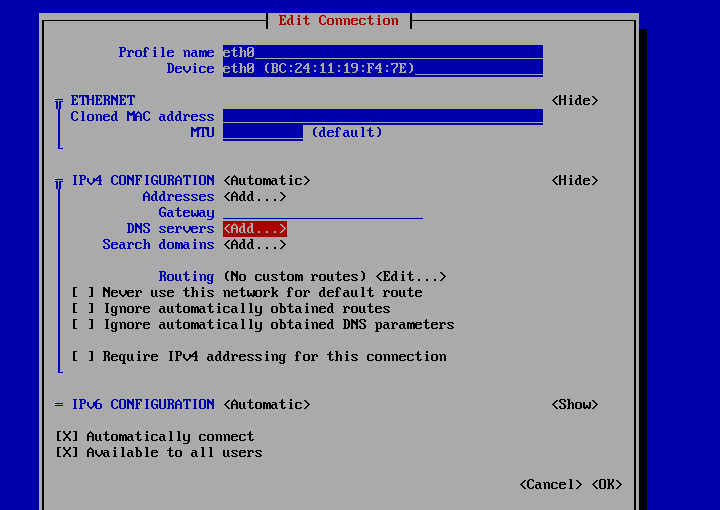
Add the DNS server.
Editing the resolv.conf will work, but the entry may go away with a reboot.
1. [forward@test-fwd-fips-1 ~]$ cat /etc/resolv.conf

2. # Generated by NetworkManager

3. search localdomain

4. nameserver 192.168.15.1

5. nameserver 172.16.14.1

6. nameserver 172.16.12.1
If there are no other DNS servers and it is unclear why DNS is not working, as a LAST RESORT, the hosts file can be updated:
1. [forward@test-fwd-fips-1 ~]$ cat /etc/hosts

2. 127.0.0.1   localhost localhost.localdomain localhost4 localhost4.localdomain4

3. ::1         localhost localhost.localdomain localhost6 localhost6.localdomain6
For the host that is not able to be resolved, the entry can be added to this file.
1. [forward@test-fwd-fips-1 ~]$ cat /etc/hosts

2. 127.0.0.1   localhost localhost.localdomain localhost4 localhost4.localdomain4

3. ::1         localhost localhost.localdomain localhost6 localhost6.localdomain6

4. 172.16.11.25 labdc02.ad.lab.local
While this solution will work, It can create problems long term. At some point the DNS issue will get resolved and eventually over time , the host entry in the hosts file and DNS will conflict or drift and additional troubleshooting will need to take place. Use the hosts file as a LAST RESORT.
TLS Certificate issue
If while testing the TLS connection to the LDAPS source in the Forward platform, you get an error testing the certificate:
The certificate needs to be validated.
We can connect to the LDAPS source using openssl to see what certificates are being presented.
Run the following command from the Forward platform:
1. openssl s_client -connect {ipaddress of server: port for SSL} --showcerts
Example:
 1. [forward@test-fwd-fips-1 ~]$ openssl s_client -connect 172.16.14.11:636 --showcerts

 2. CONNECTED(00000003)

 3. Can't use SSL_get_servername

 4. depth=1 DC = local, DC = lab, DC = ad, CN = WinCA

 5. verify error:num=20:unable to get local issuer certificate

 6. verify return:1

 7. depth=0 CN = labdc01.ad.lab.local

 8. verify return:1

 9. ---

10. Certificate chain

11.  0 s:CN = labdc01.ad.lab.local

12.    i:DC = local, DC = lab, DC = ad, CN = WinCA

13. -----BEGIN CERTIFICATE-----

14. MIIHYDCCBUigAwIBAgITWQAAAAedrm27u7xcBgAAAAAABzANBgkqhkiG9w0BAQsF

15. ADBQMRUwEwYKCZImiZPyLGQBGRYFbG9jYWwxEzARBgoJkiaJk/IsZAEZFgNsYWIx

16. EjAQBgoJkiaJk/IsZAEZFgJhZDEOMAwGA1UEAxMFV2luQ0EwHhcNMjUwMTExMTM0

17. MzMxWhcNMjYwMTExMTM0MzMxWjAfMR0wGwYDVQQDExRsYWJkYzAxLmFkLmxhYi5s

18. b2NhbDCCASIwDQYJKoZIhvcNAQEBBQADggEPADCCAQoCggEBAOym2whIlqys43hA

19. +VRVj4zpB5gkIKVjfgh2kUKLPB3tt8d0vgofFjWvS/9MF87jDfRuPkrf3TQKuylh

20. ymfWwDZcaCLojIzTyprp5vlz82qY/lwyWwfENegr6QSwMew0RpvtwAoiK6RfXJHX

21. a5C2HB0CAwEAAaOCA2IwggNeMC8GCSsGAQQBgjcUAgQiHiAARABvAG0AYQBpAG4A

22. QwBvAG4AdAByAG8AbABsAGUAcjAdBgNVHSUEFjAUBggrBgEFBQcDAgYIKwYBBQUH

23. AwEwDgYDVR0PAQH/BAQDAgWgMHgGCSqGSIb3DQEJDwRrMGkwDgYIKoZIhvcNAwIC

24. AgCAMA4GCCqGSIb3DQMEAgIAgDALBglghkgBZQMEASowCwYJYIZIAWUDBAEtMAsG

25. CWCGSAFlAwQBAjALBglghkgBZQMEAQUwBwYFKw4DAgcwCgYIKoZIhvcNAwcwHQYD

26. VR0OBBYEFIQiImYPLEe+bhaU8c0HqbcTHjdXMB8GA1UdIwQYMBaAFLLxj8f8unA+

27. mw5v8NqMAgpWBM3/MIH1BgNVHR8Ege0wgeowgeeggeSggeGGga5sZGFwOi8vL0NO

28. PVdpbkNBLENOPVdpbkNBLENOPUNEUCxDTj1QdWJsaWMlMjBLZXklMjBTZXJ2aWNl

29. cyxDTj1TZXJ2aWNlcyxDTj1Db25maWd1cmF0aW9uLERDPWFkLERDPWxhYixEQz1s

30. b2NhbD9jZXJ0aWZpY2F0ZVJldm9jYXRpb25MaXN0P2Jhc2U/b2JqZWN0Q2xhc3M9

31. Y1JMRGlzdHJpYnV0aW9uUG9pbnSGLmh0dHA6Ly93aW5jYS5hZC5sYWIubG9jYWwv

32. Q2VydEVucm9sbC9XaW5DQS5jcmwwggEGBggrBgEFBQcBAQSB+TCB9jCBqAYIKwYB

33. BQUHMAKGgZtsZGFwOi8vL0NOPVdpbkNBLENOPUFJQSxDTj1QdWJsaWMlMjBLZXkl

34. BgNVHREEOTA3oB8GCSsGAQQBgjcZAaASBBABiihyOiVjRosAtGuPTQDighRsYWJk

35. YzAxLmFkLmxhYi5sb2NhbDANBgkqhkiG9w0BAQsFAAOCAgEADaBOdNrCYzO7yjTW

36. XOEXmhU1Ls+9KE2/jKUn45SkaA72U+WKDweMGEU57+ooE/EPWFgKQdLAi8MS9MKR

37. RxxeurgVvegH7juR+TzetGo4VgRQ6jcsRp81bf8+DbrjfGRDGT/hCT44g57uqYfU

38. AA0SAAu72qN52CeLdhxG7x4nA9d4yYcCpx7TZ39iUvPJn3Ob8HRQONi/0xZZ0CeJ

39. 5RReCe2Ws1G6qIx0ZuWmXOIgDZTutYoVW91iQgL5ryDolQmGD+b5a9+eUQz50aEQ

40. ktbFgQ3VD3OY5U4OUAoMQXBHz/65sj04P9ZH19t6HCiIZGrdDXLBGW1mc1En5CVc

41. KKIA6fGy1FLa/wAcA2bdJYaJdz6kzzjHhwRWlaq/dpLgP57kDb8tRByx1Ca/jF9+

42. AEWVkMHSsi2hurCzFGFd8/pBNiQXA11DAogRlg9QwpE2hCcIkmA0+LksQPdYsnR7

43. kN9mk253Qde9wAs1/sievPADwIDlzVKfHwsx3rz1NUEO9CcUSFbYx87TupmH0Z9t

44. I+4j41iI3QxzlpoFFEE6Piv+E29MMCA1UbVCtL1TAm60EGkGtNoiKZkyDMR72oo6

45. FQVHcmTls1/qE3qIQBCbCwGzrmOdSv/aVuw/vtMuxcrkNblmSsvPW/m0j7MPHWAb

46. b4pFYM/+sBc14EFNapXzjyMDY1E=

47. -----END CERTIFICATE-----

48.  1 s:DC = local, DC = lab, DC = ad, CN = WinCA

49.

50. -----BEGIN CERTIFICATE-----

51. MIIF7zCCA9egAwIBAgICEAIwDQYJKoZIhvcNAQELBQAwgY0xIzAhBgkqhkiG9w0B

52. CQEWFHlvdXJlbWFpbEBtcGx4LmxvY2FsMQswCQYDVQQGEwJVUzELMAkGA1UECAwC

53. VkExEjAQBgNVBAcMCUNoYW50aWxseTENMAsGA1UECgwERGFhczEaMBgGA1UECwwR

54. RGFhUy1UZXN0IFJvb3QgQ0ExDTALBgNVBAMMBHJvb3QwHhcNMjQxMTE3MTczMDE4

55. WhcNMzQxMTE1MTczMDE4WjBQMRUwEwYKCZImiZPyLGQBGRYFbG9jYWwxEzARBgoJ

56. kiaJk/IsZAEZFgNsYWIxEjAQBgoJkiaJk/IsZAEZFgJhZDEOMAwGA1UEAxMFV2lu

57. Q0EwggIiMA0GCSqGSIb3DQEBAQUAA4ICDwAwggIKAoICAQDDa2axEJvB3DzQGb8C

58. UdVuV0VozRjZ/04jQ7Zgb/kzdCRgs8FGyFkPe9yNamSH+8Q9dy1ixzViZPyUJLL1

59. kNdJ3Odnq+FnJeLkO8hcFugbcUAIVQwnDOAU0LSB+M6F+Uksh+0/KtwwkfAF2Uhn

60. rYUj5f9POi0R+KThsBrAUqJ3bc79tRhD9/i2Ybuo9PJeLySp4PVy/O2kabhsR7++

61. B0kM3USD310P68slrx63hwoRZlUfYNLlDSAdwSP16j/dVk4Nd+zyX3c3Ah4IbuEt

62. sOZyRi8CzprxXgQuUvoCiUt02Fh5XhB29PDh0cOuFvM27MQKkfitWORcy5HLBch7

63. m+Wu5wyIz5A8/i9mwTCWgIWkpSoljYgJJFRB3TokcWfcYKZJf5HBFleV6pl4+6Ds

64. Il1GDY2PsTh6cKNvwpdPKtCm3A7+La5uVjyJKnfEavuLdlR65LBIH6st8IQIl2+P

65. NVGNHXznVXC+P8WIsIW8/XcR/QIDAQABo4GUMIGRMB0GA1UdDgQWBBSy8Y/H/Lpw

66. PpsOb/DajAIKVgTN/zAfBgNVHSMEGDAWgBTlfZC2UAr+loOAkXgwrE0+kITx3DAS

67. BgNVHRMBAf8ECDAGAQH/AgEAMA4GA1UdDwEB/wQEAwIBhjArBgNVHR8EJDAiMCCg

68. HqAchhpodHRwOi8vMTcyLjE2LjE1LjkvY3JsLnBlbTANBgkqhkiG9w0BAQsFAAOC

69. AgEAs/q5sbGjXBzm6wseJGv1tlkMnmBCgN+7Xyd23p78i7KBZyLQc5tCfW5StcEU

70. ZGl0dzF+bHcO7FD1Bd8u3Zj9R/nQG+xJEc1CEeaIjoLeidRcHwBJ42LCQCZ3nBaQ

71. gF9BeU7oVRqIkwvHlcOJ8jMLIwUAciUbaO7dFnZxxO+sa5cCOdNi7p9cSxvpv2jQ

72. NvQTmwfMMTXX2IEu8DwsJqLs8PYvZtuDX5OCPRaX9j6f/Gtth9EdOHfzRTqbGD9a

73. o7WB6EgcNW9NtXQ278bHuJA4YMmqPGtfNcxWPiINLxi/D3lDmscZhDYRNkxqCuXf

74. LhT/L2SkPHJg9zeuaqXS1gcQKRDxqzhNMaf99hA5wccxMVKC00O6by+Ti16KyQvI

75. 0F1KrOcPcIVoA25JLd/WUQsd++tAv3y9vQ8lyanzdc/0KVzF5D3MFuBfcOuU3DaP

76. OqC64JDLMINoBhBhb5SZM3TTjsv9fLa0X8FOuFJr3qlLigUKnDq8ndSJ0A8vu5b6

77. PgCWaoyrFLjiPooiD7IGsKG8Xe45C3ukF/nZ6GWipHXhjVoQIOLxb4Xo/A0kjn3I

78. 3wO+k3ugDB83NDd05o33+E7rywqwo+oubIssVYLmQ6eZgY/vsezUNQP96jn0aSCT

79. ot/p6Jx8srvKSjks/97LFVxq27z/goOVwN7kO1B/mT/7PUg=

80. -----END CERTIFICATE-----

81. ---

82. Server certificate

83. subject=CN = labdc01.ad.lab.local

84.

85. issuer=DC = local, DC = lab, DC = ad, CN = WinCA

86.

87. ---

88. No client certificate CA names sent

89. Client Certificate Types: RSA sign, DSA sign, ECDSA sign

90. Requested Signature Algorithms: RSA-PSS+SHA256:RSA-PSS+SHA384:RSA-PSS+SHA512:RSA+SHA256:RSA+SHA384:RSA+SHA1:ECDSA+SHA256:ECDSA+SHA384:ECDSA+SHA1:DSA+SHA1:RSA+SHA512:ECDSA+SHA512

91. Shared Requested Signature Algorithms: RSA-PSS+SHA256:RSA-PSS+SHA384:RSA-PSS+SHA512:RSA+SHA256:RSA+SHA384:ECDSA+SHA256:ECDSA+SHA384:RSA+SHA512:ECDSA+SHA512

92. Peer signing digest: SHA256

93. Peer signature type: RSA-PSS

94. Server Temp Key: ECDH, P-384, 384 bits

95. ---
In the example above, the connection to the LDAPS source presented two certificates. The first one is the certificate from the actual server. The second one is the certificate of the windows certificate authority. These can both be tested. To check the validity of the certificate in windows, cut and paste each certificate from this output into their own notepad document.
Copy each certificate starting and ending at:
1. -----BEGIN CERTIFICATE-----

2. -----END CERTIFICATE-----
Save the file and rename the file extension from .txt to .cer
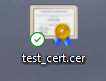
Open the certificate (double-click or right-click → open) to look at the properties
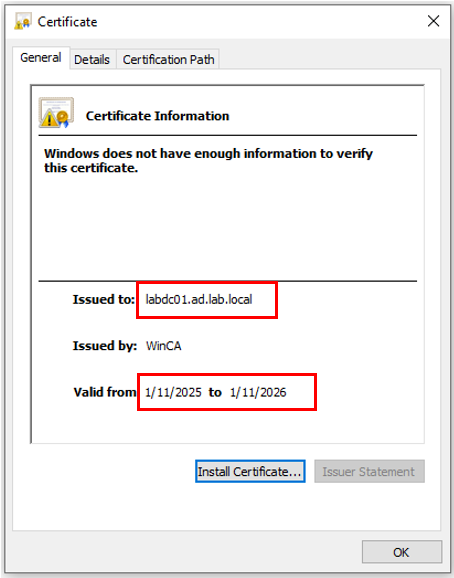
Here we can see the certificate in not expired.
Here is the second certificate in the openssl output:
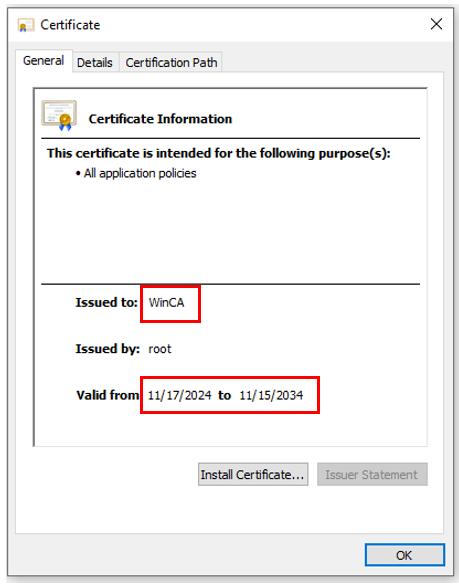
This is the certificate for the Certificate Authority and also has not expired.
If the certificates check out and the test LDAP connection is still not working, it is possible that the certificate chain is required. In this case copy and paste both certificates back to back into the certificate field in the forward platform. Note that a certificate chain typically is at least 3 certificates. The root ca, the sub-ca, and the cert of the connecting server (LDAP).
By integrating Forward Networks with LDAP or LDAPS, organizations can streamline authentication, enforce consistent security policies, and provide users with the right level of access to critical network data. This setup not only enhances operational efficiency but also strengthens compliance and security by leveraging existing directory services. Once configured, administrators can easily manage user permissions through Active Directory, ensuring a seamless and scalable access control model. With a properly integrated authentication system, your team can focus on optimizing network operations with confidence.
Have questions? Ask below!

