

When deploying Forward Networks' on-premises solution, securing communications with a trusted SSL/TLS certificate is essential. The first step in this process is generating a Certificate Signing Request (CSR), which is required to obtain a signed certificate from a Certificate Authority (CA). A CSR contains key details about the organization, including domain names and encryption settings, ensuring that the certificate issued aligns with the network's security requirements. This guide walks through the step-by-step process of creating a CSR for Forward On-Prem deployment, including generating a configuration file, using OpenSSL to produce the CSR, and submitting it for signing.
Create a CSR for Forward On-Prem Deployment
There are two ways to create and generate a CSR, manually or using an answer file. The choice is up to the user, but the answer file is less error prone.
- The manual process involves answering questions at the command line (CLI) using openssl.
- The answer file process involves creating a text file that is called by openssl.
Step 1 - Choose a method to create a CSR
Step 1a - Manual process
Run the following command from the CLI to generate the CSR.
openssl req -newkey rsa:2048 -nodes -keyout private.key -out myCSR.csrLet’s break the command down:
- openssl is the command for running OpenSSL.
- req is the OpenSSL utility for generating a CSR.
- -newkey rsa:2048 tells OpenSSL to generate a new 2048-bit RSA private key. If you would prefer a 4096-bit key, you can change this number to 4096.
- -nodes tells OpenSSL to not encrypt the private key. Please see Step 5 below for more information.
- -keyout private.key specifies where to save the private key file. Protect this key file!
- -out myCSR.csr specifies where to save the CSR file.
- With these last two items, remember to use your own paths and filenames for the private key and CSR, not the placeholders.
After typing the command, press enter. You will be presented with a series of prompts:
- You will now be prompted to enter the information which will be included into your CSR. This information is also known as the Distinguished Name, or DN. The Common Name field is required when submitting your CSR, but the others are optional. If you would like to skip an optional item, simply type enter when it appears. Make sure your inputs meet your organization’s requirements for TLS certificates:
- The Country Name (optional) takes a two-letter country code.
- The Locality Name field (optional) is for your city or town.
- The Organization Name field (optional) is for the name of your company or organization.
- The Common Name field (required) is used for the Fully Qualified Domain Name (FQDN) of the website this certificate will protect.
- Email Address (optional)
- The Challenge Password is optional and can be skipped.
Upon completion of this process, you will be returned to a command prompt. You will not receive any notification that your CSR and private key was successfully created.
Warning - Do not share your private key file!
Step 1b - Answer file process
- Create answer file for openssl named answerfile.conf
- Replace the highlighted sections with appropriate responses for your needs.
NOTE - In the
[alt_names]section, add as many aliases and IP addresses as needed.
Examples:- DNS.X are hostname aliases
- IP.X are the public/routable IP addresses for the clustered nodes that would take over in a fail-over situation.
[ req ]
default_bits = 2048
distinguished_name = req_distinguished_name
req_extensions = req_ext
prompt=no

[ req_distinguished_name ]
countryName = US
stateOrProvinceName = Virginia
localityName = Chantilly
organizationName = Company Name
organizationalUnitName = Division
commonName = hostname.fqdn
emailAddress = username@domain

[ req_attributes ]
challengePassword = password

[ req_ext ]
subjectAltName = @alt_names
keyUsage = digitalSignature, keyEncipherment

[x509_ext]
keyUsage = digitalSignature, keyEncipherment

[alt_names]
DNS.1 = hostname.fqdn
DNS.2 = alias.fqdn
IP.1 = IP_ADDRESS.1
IP.2 = IP_ADDRESS.2
IP.3 = IP_ADDRESS.3 -
Save the answerfile.conf
-
Run the following command from the CLI to generate the CSR.
openssl req -new -config answerfile.conf -nodes -keyout private.key -out myCSR.csr Upon completion of this process, you will see the following output:
Generating a RSA private key
.........+++++
...........................................................................................+++++
writing new private key to 'server.key'
-----
Warning - Do not share your private key file!
Step 2 - Submit your CSR to your CA for server certificate generation.
This step varies with each organization, but the general steps will remain the same.
You will need to submit the CSR file generated from step 2 to the Certificate Authority (CA). The CA may be internal to your organization, or may be a third party. Different CAs may have different requirements necessary to be issued the certificate, but it all begins with the CSR. Follow the steps for your specific CA to be issued the certificate.
Step 3 - Combine the server certificate with the intermediate cert(s) and root cert to form the full CA chain (if needed)
Your CA will issue a server certificate as well as provide the intermediate certificate(s) and root certificate used to sign the server certificate. Some CAs will provide all of these in a single file, others will provide them separately. Before installing the certificate on the Forward platform, you must make sure the full CA chain has been combined into a single file.
It is important to get the order of the certificates correct. Each certificate builds upon one another until you reach the root certificate. An example is shown below:
-----BEGIN CERTIFICATE-----
[Server Certificate]
-----END CERTIFICATE-----
-----BEGIN CERTIFICATE-----
[Intermediate certificate L1]
-----END CERTIFICATE-----
-----BEGIN CERTIFICATE-----
[Intermediate certificate L2 (if present)]
-----END CERTIFICATE-----
-----BEGIN CERTIFICATE-----
[Root Certificate]
-----END CERTIFICATE-----
This chain can be built manually by creating a new text file and combining these certificates in the correct order, or via the CLI by appending each file in the correct order.
If completing this via CLI, you can use the following command, replacing the file names with the actual file name of each certificate:
cat server.crt intermediate1.crt intermediate2.crt rootca.crt > full_chain.crtYou can verify the chain is complete by running the following command, replacing the file names as appropriate:
openssl verify -CAfile rootca.crt full_chain.crt
Step 4 - Convert your private key to plain text (if necessary)
In step 1, you generated private.key as a part of your CSR creation process. If you did not use the -nodes flag, you would have been prompted to create a pass phrase, and your private key was encrypted with that pass phrase. The Forward platform cannot read an encrypted key file, so it must be decrypted before being uploaded to the platform.
If you are unsure if the private key is encrypted, open the file and check the top line:
Encrypted private key will begin with: —--BEGIN ENCRYPTED PRIVATE KEY—--
Plaintext private key will begin with: ---BEGIN RSA PRIVATE KEY---
If your private key is encrypted, run the following command to decrypt the private key. Make sure you update encrypted_private.key to match the filename of your key:
openssl rsa -in encrypted_private.key -out decrypted_private.key
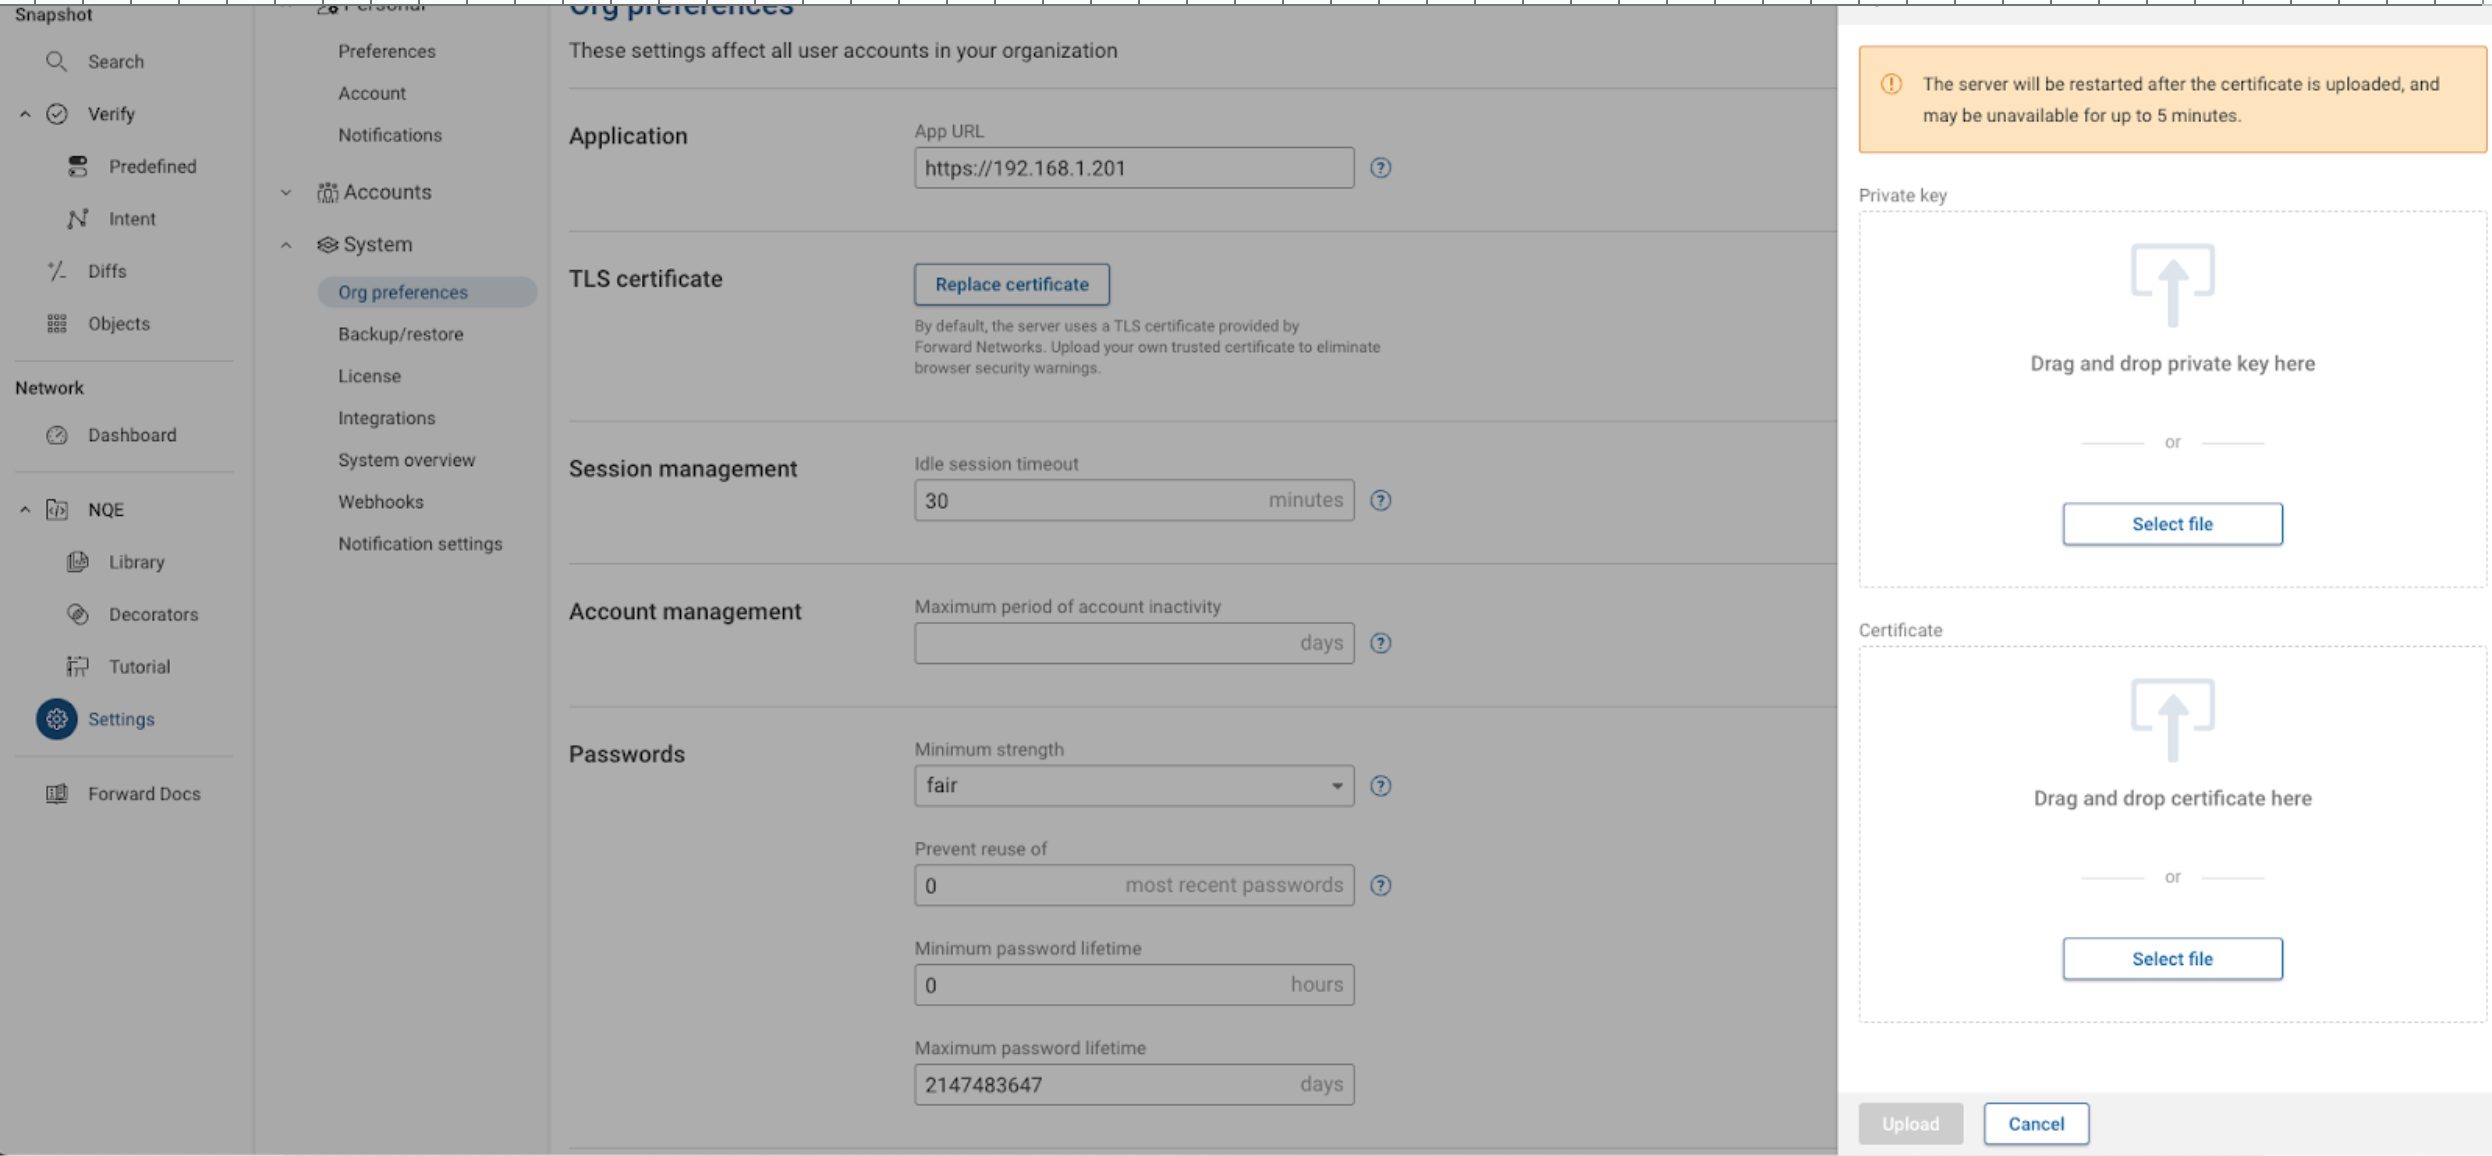
Step 5 - Add the certificate and key
Gather your decrypted private key file and full certificate chain file and upload them to the Forward Platform by going to Settings > System > Org Preferences > TLS Certificate:
Confirm the change was successful by reloading the Forward platform and confirming the new cert was loaded by checking the certificate details in the web browser.

